Exploring Motherboard repair possibilities through company service center without computer technician support, in rural India; Below Rs.3000 (US$40) limited functionality Linux mini PC box with 1 year warranty
I thought of putting up this detailed post as I felt it may be helpful to some others who find themselves in the same cornered position that I found myself in, when my assembled PC desktop stopped working due to what was later diagnosed as a motherboard failure, and I wanted to explore options to repair the motherboard.
Assembled desktop PC stops working; Technician’s view that motherboard is the problem; Advised to buy new motherboard & processor
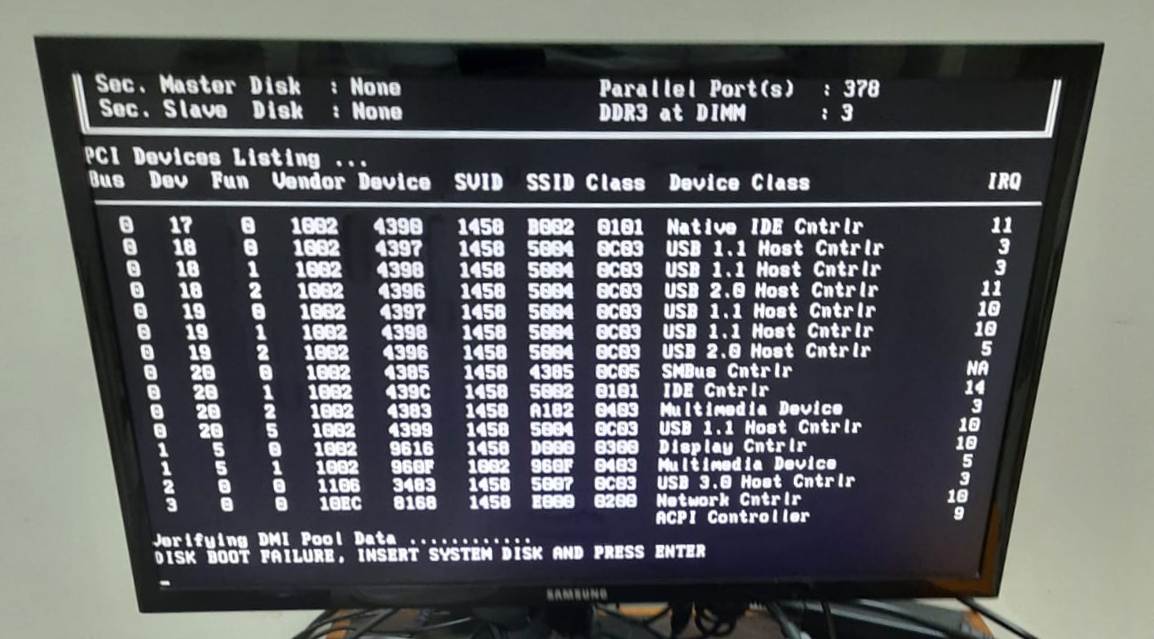
Around a month back, on or around 22nd October 2021, my desktop PC did not give any display on powering up the PC. I opened up the desktop PC box, cleaned up the dust collected in it, removed the RAM stick and inserted it back, and tried starting up the PC again. Same problem was repeated. The SMPS was delivering power to the CPU fan as it was rotating when powered on. But there was no display! Moving the RAM stick to another memory slot did not help either. This problem was beyond my very limited knowledge and ability in hardware. I had to call a local computer technician for solving the problem.
I switched to using an alternate computer I have for such contingencies – a Dell mini Laptop. I must mention here that one unusual health issue I face with devices using rechargeable batteries including Laptop and mobile phone, is that the small amount of gas released by these rechargeable batteries on usage, especially if I am in closed room with limited ventilation, triggers my allergic rhinitis problem! So I try to limit the laptop usage to a minimum and also try to use it in my enclosed balcony/sit-out next to a large open window (with mosquito net) so that some of the battery gas goes out of the balcony quickly. Same is the case with my mobile phone.
But even the desktop computer needs a UPS which uses a rechargeable battery! Well, what I have done is kept the UPS in the balcony and got some wiring done to provide UPS power points in my bedroom/work room. This allows me to put on the UPS, close the door from my bedroom to balcony, and then use the desktop PC. In this arrangement, I typically do not have a significant allergic rhinitis impact. Also I have an exhaust fan in the enclosed balcony, which I put on for a few minutes when I go to the balcony after using the UPS & desktop computer for some time.
Given this background, it was relatively urgent for me to fix my desktop PC problem or at least have an alternative computer setup that does not use rechargeable batteries. I called the computer technician & sales person who had provided me the key components in a PC upgrade done in September 2017. Note that I use an assembled PC as that is significantly less expensive than PC bought from companies like Lenovo and Dell. The technician was kind enough to visit me on 23rd October and have a look at the desktop PC. After trying out some procedures like cleaning the RAM and then inserting it back into the memory slot, all of which did not solve the problem, the technician said that, based on his experience of many years, (he thinks) it is a motherboard problem.
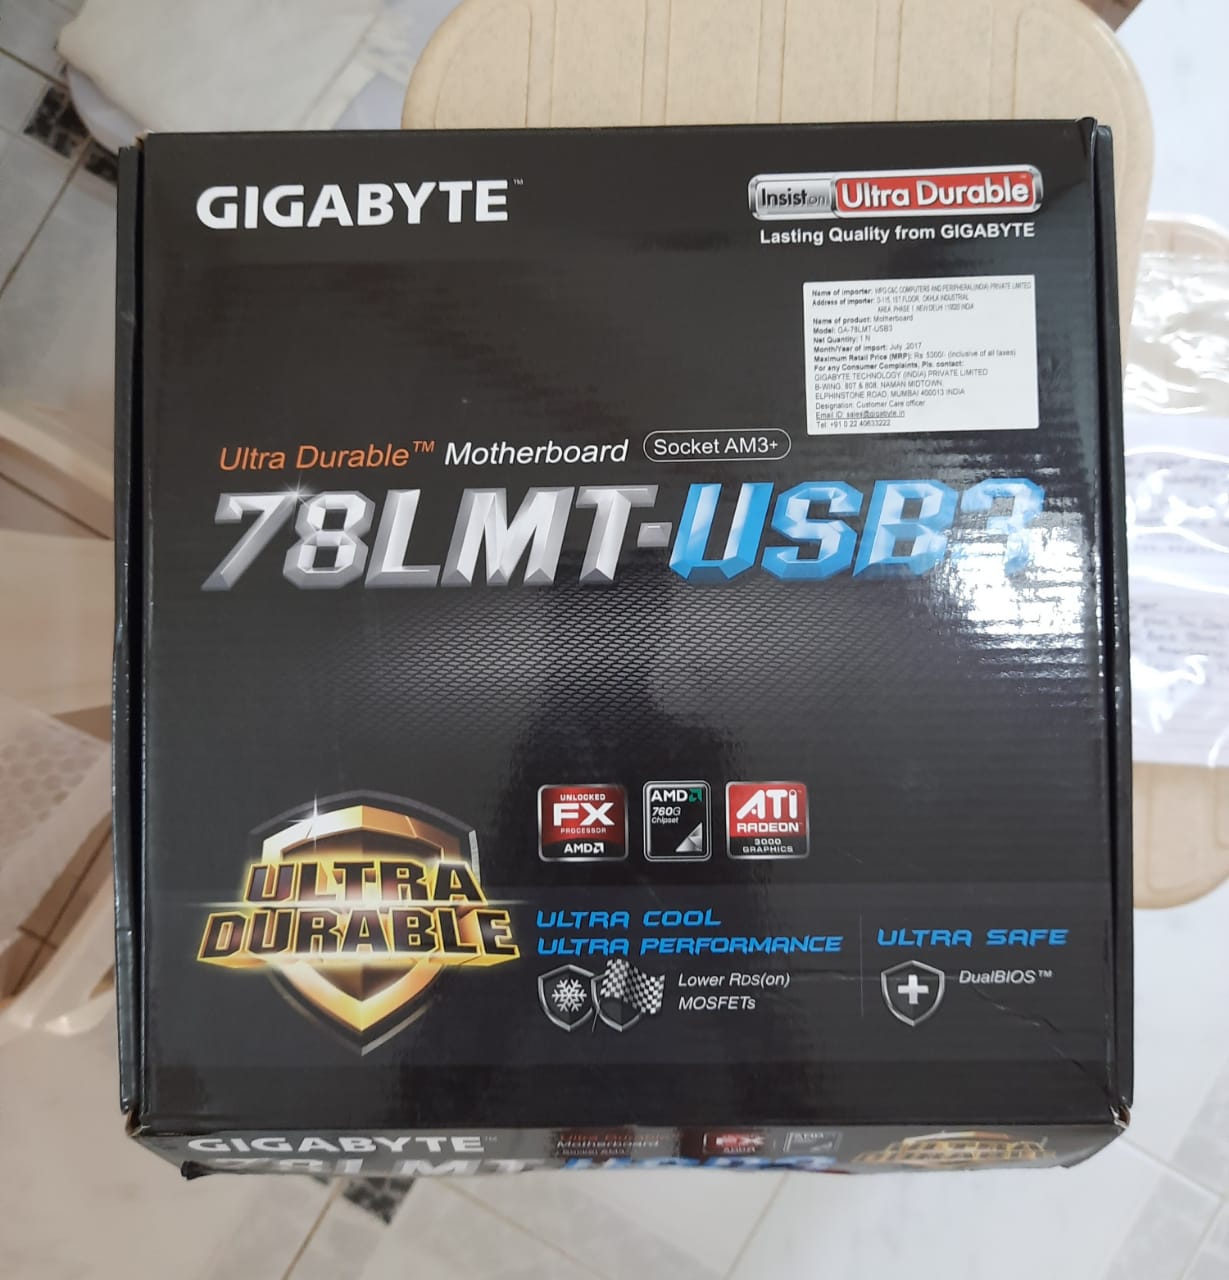
The motherboard is a GIGABYTE Motherboard - GA-78LMT-USB3 (rev. 6.0) – bought in September 2017 through the same technician-cum-seller, with 3 year warranty, which had now expired. BTW the processor of my desktop PC is AMD FX-4100 Quad-Core (3 yr warranty) and the RAM is 1 (one) Corsair Vengeance 4 GB DDR3 stick (limited lifetime warranty) also provided by the technician in Sept. 2017.
The technician initially gave me a motherboard repair possibility, at a reasonable charge, by sending it to Gigabyte service center. I was fine with that but later on the technician got too busy with other work and was not able to follow up on this possibility.
He suggested buying a new motherboard-processor-RAM combination. Note that getting a compatible new motherboard (AM3+ socket, DDR3 RAM) for my current desktop PC configuration seems possible with some effort but Indian market, or at least Indian online market, seems to have moved on to DDR4 RAM and new socket(s) for AMD processors. For Intel platform, DDR3 RAM compatible motherboards and Intel processors (new items with warranty) were still easily available in online Indian market but the current technology offerings were of DDR4 RAM and compatible motherboards and Intel processors. So, if a new motherboard purchase was being considered, the sensible thing would be to go with current technology(ies) in the (Indian) market which would necessitate buying new RAM and processor too as my DDR3 RAM and AMD FX-4100 processor were not compatible with these current technology(ies).
I was given an option of new motherboard-and-processor of older technology (Samsung H61 and Intel i5 processor (3rd generation presumably)) which used DDR3 RAM (and so my Corsair DDR3 RAM could be used) which was priced attractively at slightly less than Rs.8000 but it came with only 1 year warranty. I wanted 3 year warranty. The 3 year warranty price I was given was Rs.18,000 which was over twice the earlier figure – I think that may have been for more current technology!
I must also mention that I offered to pay the technician for his home visit to diagnose my computer problem even though the problem was not fixed, but he declined the offer. That was nice of him and I thanked him for the kind gesture.
On the computer problem front, I felt somewhat cornered. My last motherboard - Asus M2NPV-VM (AM2 socket, DDR2 RAM) - had lasted me around 6 to 7 years if not slightly more, though I upgraded the CPU and increased RAM in one partial upgrade step. I expected the Gigabyte motherboard to last me 5 years, even though its warranty was 3 years (the Asus mobo had similar warranty period). While I was ready to shell out Rs.2000 to Rs.3000 to fix my desktop PC so that it continues working for a year or two, I was not happy with the idea of being forced to do a major upgrade of my desktop computer (new motherboard, processor and RAM) for Rs.18K now itself.
Further, I wanted to know for sure that the motherboard was faulty and not processor or RAM. And even if it was the motherboard that was faulty, I wanted to know if it could be repaired for around Rs.2000 or so. I mean, I felt that as a customer I should be able to get such info. and options rather than have to simply discard the motherboard-processor-RAM combo and go in for a new motherboard-processor-RAM combo.
Low-cost (below Rs.3000/US$40) limited functionality Linux mini PC box with 1 year warranty – Micro 5 from Thinvent
[For detailed info. about Micro 5, see List of my posts related to Thinvent Micro 5, a low-cost Linux mini PC based on Tanix TX 3 Android TV box, https://ravisiyermisc.blogspot.com/2022/08/list-of-my-posts-related-to-thinvent.html .]
As it had become clear that fixing my desktop PC was going to take some time, I started exploring possibilities of temporarily doing some of my Internet related work which included watching youtube videos including news videos (I don’t have a TV, as of now), on an Android TV box device (which does not have rechargeable battery) linked to my LCD monitor and keyboard & mouse, and limiting my usage of the Dell mini Laptop. My Samsung LCD monitor has an HDMI input port. The low-end Android TV boxes are available on amazon.in for around Rs. 2700 for imported (Chinese presumably) devices with 2 GB RAM and 16 GB flash storage with typically 3 month warranty from Indian seller/importer who seems to be a somewhat reputed seller (AUSHA) in this category. These Android TV boxes have HDMI video output ports as well as USB ports on which computer USB keyboard and mouse could be connected (besides other USB devices including storage devices). They have LAN ports for wired Ethernet (for Internet access), WiFi support (to connect to Internet over WiFi), audio output connector/socket to which speaker 3.5 mm jack could be connected, and microSD card slot.
I could also use Internet browsers on these devices but I later learned that the Android on these devices was customized for TVs and Android apps that work on Android mobile devices may not work on Android TV devices. If I recall correctly, I read that Google Play store for Android TV apps is different from/specialized version of Google Play store for Android apps, but there are roundabout and possibly unsafe ways of installing general Android apps not meant for Android TV, on Android TV boxes.
However, there are Internet browsers optimized to work on Android TV devices available on Google Play store for Android TV, and I could use such Internet browsers for some of my Internet work (excluding sensitive stuff like banking and payment transactions as I don’t really know enough about how safe such browsers on Android TV boxes are).
So I could simply replace my desktop computer box/tower with an Android TV box, connected to my USB Microsoft keyboard & mouse, HDMI Samsung monitor and Logitech speaker! This could become my limited alternate computer setup for most Internet work, which did not have rechargeable battery gas problem that triggers my allergic rhinitis.
Initially I explored purchasing an Android TV box from some Puttaparthi shop/seller. I did get an interesting offer from one person but that person got too busy and could not deliver it to me. When I made inquiries (using a person’s help) with Puttaparthi TV shops, I was told that they don’t have it.
While I was doing all this, I was also exploring low-cost mini PC possibility purchase from Internet. I came across a Thin client/mini PC from Thinvent company - Micro 5, at a below Rs. 3000 price point: https://www.thinvent.in/catalog/micro-5-mini-pc/ , which could act as a stand-alone limited capability Linux mini PC but which capability included Internet browsing using Firefox or Chromium as well as Libre Office suite and VLC player. Micro 5 key hardware specifications are: Quad-code ARM Cortex A53 CPU, 2 GB RAM, 16 GB Flash storage, HDMI, LAN port, WiFi, 2 USB slots, 1 microSD slot and 3.5mm stereo audio port.
Note that 1 US$ is around Rs.75 now and so Rs.3000 is equivalent to US$40 (3000/75).
Instead of an Android TV box, I could use the Micro 5 as my limited alternative computer box without rechargeable battery, as it had all the ports/connectors of the Android TV boxes mentioned earlier! [Later I came to know that the Micro 5 device I got is an Android TV box on which Linux was installed (replacing Android OS) by Thinvent company! For more, see my recent post: Interesting possibility of using low-cost Android TV boxes as low-cost mini PC box with Ubuntu MATE Linux OS, https://ravisiyermisc.blogspot.com/2021/11/interesting-possibility-of-using-low.html ].
G1 is another vendor in this category but its lowest mini PC product is sold at around Rs.5000, I gathered [ https://g1thinclientpc.com/rdp-thin-client-pc/ lists the related product as “G1 Thick Client” at price of Rs.4200 + GST (+ shipping)].
Initially when I came across the Thinvent Micro 5 product at Rs.2700 + shipping (shipping cost me around Rs. 180 from Gurugram to Puttaparthi) and so less than Rs.3000 home-delivery priced product with a 1 year company warranty, I found it hard to believe! So I got into a chat with the salesperson/contact person on their website, and the person gave me very satisfactory responses to my questions. This was a serious company product from an Indian company! I have to say that I was thrilled to see an Indian company sell such a cost-effective product with a 1 year warranty and which company had a decent website with support via chat, email & phone.
After a waiting time for a day or so, when I found that the product continued to be very attractive to me, I ordered and paid for it on 28th Oct.
Current technology motherboard-processor-RAM upgrade cost
I also started exploring prices on Indian Internet shopping sites for AMD (AM4 socket, DDR4) & Intel (LGA 1200 socket, DDR4) current Indian market processor-motherboard-RAM combinations for budget desktop computer with 3 year (or more) warranty. They came to around Rs.14,000 for AMD 3000G processor, Asus/Gigabyte Mobo & 8GB Corsair RAM to Rs. 18,000 for Intel i3-10100F (10th gen.) processor, Asus/Gigabyte Mobo & 8GB Corsair RAM (8GB Corsair DDR4 RAM costs around Rs.3400 and is only Rs.1000 more than 4GB Corsair DDR4 RAM and so I used only 8GB RAM in above combinations). I don’t want to go into further details of the above components and configurations in this document.
I also learned that it was very difficult to get AM3+ motherboards now in Indian online market whereas similar older Intel technology motherboards were easy to find. So I felt that if I do go for a desktop computer upgrade, I should go with Intel technology as that most probably will give me more options for repair/partial upgrade in the future than if I go for AMD. The price for such a current budget Intel technology upgrade was Rs.18K!
Pursuing Gigabyte motherboard repair possibility
Note that some of the activities mentioned above were done in parallel. Even before I had finished some of the above activities, I had decided to first check out the Gigabyte motherboard repair possibility before going in for an upgrade, by trying to find some other technician in my town who was willing to take up that work. I had one contact already and was planning to get in touch with him. It was a great shock to me to know that this other person, who was perhaps in his late twenties or early thirties, had passed away earlier this year due to COVID in the 2nd Corona wave in our town. I was told that he was married and had a small child. What a horrible thing this COVID pandemic is, even though it seems to have significantly waned in India over past few months!
It took me quite a while to get over the shock of knowing about passing away of above mentioned technician. After recovering from the shock, I started making inquiries about other computer technicians in Puttaparthi who would be willing to handle my desktop computer problem by first exploring motherboard repair possibilities before going in for upgrade/replacement of motherboard. After getting contact info. of another such person, I contacted him. The gentleman told me he would visit my flat but he did not come. I tried him again. Again he said, he would come but did not turn up! I had to give up on him, at least for the current problem. I am mentioning this in some detail as I wanted to document these challenges of getting computer technicians to visit one’s flat to fix computer problems in rural India. Of course, my exposure to rural India is limited to Puttaparthi but I expect it to be somewhat similar or worse in this matter, in many other parts of rural India.
Yet another contact I got, was fruitful. The gentleman visited my flat on 31st Oct. and had a look at the desktop computer problem. He was professional in his work. He quickly checked out the computer. He had also brought some working RAM (DDR3) with him which he tried on my computer but without success. After all this work he concluded that most probably it is the motherboard that is at fault (like the earlier technician’s conclusion).
I asked him to take my RAM with him and check it on his machine which he did in a short time after he left, telling me my RAM works and sending me a video of it! That was impressive service work from him.
Regarding solution possibilities, he was willing to help me check out the motherboard by sending it to Gigabyte service center, and mentioned the charges involved for sending it and getting it back. He also pointed out some other issue in the current electrical setup I had for the computer and helped me resolve it. His charge was Rs.200 which I think is the standard charge for such visits. Overall, I was very happy with this gentleman and his service. My problem had cropped up on or around 22nd Oct. and I was able to get the right person who was willing to help me with it as per my wishes (i.e. exploring motherboard repair possibility) on 31st Oct.! This shows some of the challenges faced in desktop PC repair in Puttaparthi.
Removing and inserting processor-fan and processor from/on motherboard, and also disconnecting/connecting power connectors from SMPS to motherboard; Checking out SMPS & motherboard-processor-RAM after removing them from cabinet
Earlier, by 29th Oct., I had got quite frustrated with the jam that I found myself in. The root cause of the issue was my lack of knowledge about diagnosis and repair possibilities for motherboard+processor+RAM on my desktop computer box. While, after coming to Puttaparthi, I had learned to do some level of computer box maintenance on my own, like removing and inserting RAM, PCI expansion cards and internal hard disks, I had never removed/inserted the processor+fan from/on the motherboard and was not even familiar with the power connections from SMPS to various points in the motherboard.
[Note that while in Mumbai/Dombivli which was prior to Oct. 2002 when I moved to Puttaparthi, I really had no need to even open the computer cabinet box as computer technicians were easily available. Even for my personal desktop PC at my home (first purchased in 1993/94, I think), they would come to my home, fix the problem, and I would pay the charges - as simple as that. I would focus on my software work on my desktop computer delegating all hardware work to hardware technicians who were easily available.]
I decided to read up and view up (videos) on removing CPU fan & processor from motherboard, clean it (including wiping off cooling paste on it) and then place it back. I found the Internet to be a great source of teaching material on this. In particular, I saw a lot of Indian language (mostly Hindi but some Telugu also) videos on inserting /connecting /removing /disconnecting motherboard, processor, RAM and SMPS power cables in/on/from motherboard and desktop computer cabinet.
As an example, I found the following Aug. 2021 video to be an excellent teaching video on how to assemble a low-cost (around Rs.10K) computer. The video is in Hindi and the speaker says clearly at the outset that he has used some components which are new and some which are second-hand. If all new components were used I am sure the price would get bumped up significantly. (In Hindi) i7 COMPUTER PC BUILD @ Rs 10,000, https://www.youtube.com/watch?v=bLpEA_WEVGY , 21 mins. 2 secs., published on 22nd Aug. 2021. An issue with the above video is that the links to purchase some of the components online lead to different links from what one expects. But from the perspective of a tutorial to assemble a PC using its various components, I think it is an excellent tutorial in Hindi.
There are also videos with suggestions on fixing some common problems with motherboards, including the no display problem I faced. Two such video links are given below:
- (In Hindi) Fontech 945 motherboard No display//Error Code "00"//100% solve, https://www.youtube.com/watch?v=RibKUCYIP2U , 21 min. 32 secs., published on 16th Nov. 2019.
- (In Hindi) How to repair No Display Computer || Bios Problem || No Display Motherboard | No Signal by PK Expert, https://www.youtube.com/watch?v=B4NmgL_pXjE , 15 min. 27 secs., published on 24th Nov. 2020.
After some cleaning with a brush and cloth (I do not have any appropriate alcohol for such cleaning), and using a small size vacuum cleaner on motherboard, CPU fan, CPU, RAM and cables, I tried to insert/ connect them back together but outside the cabinet. I tripped up on a few things but was able to correct myself. I learned about powering up the motherboard by using a screwdriver head on the motherboard pins for power on. Note that I did not have CPU cooling paste then (later I ordered and got it) and so after I had wiped the cooling paste off with a cloth in the cleaning process, when I put everything back in, there was no cooling paste between processor and processor fan.
I was successful in putting the system together outside the cabinet. Power on was resulting in CPU fan rotating but still there was no display. I experimented with having only CPU without fan, removing RAM, giving power to CPU but not to CPU fan etc. - nothing changed the no display outcome.
I also got out my old Asus motherboard (M2NPV-VM), CPU and RAM, which had stopped working in or around 2017 (due to which I upgraded my PC to this Gigabyte motherboard and matching CPU & RAM). I connected the SMPS to them and connected keyboard and display. Same issue. Powering on resulted in CPU fan rotating but no display (and no keyboard light on Caps Lock or Num Lock).
I took some pics well after I was into the work where I had finished trying out Gigabyte motherboard and was trying out older Asus motherboard. So the pics below show more of my Asus motherboard related work.

Above pic: My Gigabyte motherboard (mobo) with processor but without processor fan.

Above pic: Asus mobo connected to SMPS (and monitor and keyboard)

Above pic: AMD Athlon 64 X2 (dual core) processor in Asus mobo (Sorry pic is upside down. I am not well versed enough with Libre Draw program on Micro 5, as of now, to quickly edit and save these pics with decent resolution.)

Above pic: Processor pins side and after cleaning, I think. Also, I think it is the AMD Athlon 64 X2 processor (from Asus mobo)

Above pic: Asus mobo processor socket with processor removed

Above pic: Now the (cleaned) processor has been inserted back into the processor socket on Asus mobo.
I dug deeper into videos on the Internet on this matter. Some Indian language videos went very deep into such issues and had the technicians use multimeters to measure voltage at various points in the motherboard and also use soldering iron at times. The speakers were well versed with components on the motherboard using terms like MOSFETs as well as North bridge/South bridge. There was even a video of a teacher having a class (in Hindi) on such motherboard repair using some diagnostic PCI card! This was too in-depth for me! But I was so happy to see that so many of my fellow countrymen had acquired such expertise in PC motherboard problem diagnosis and repair, and had put up videos on it in Indian language(s). Given below are some of these videos:
- (In Hindi) NO DISPLAY MOTHERBOARD WITH 00 00 ERROR IN DEBUG CARD, https://www.youtube.com/watch?v=gHDgFIZqCYs , 10 min. 53 secs., published on 16th Nov. 2017.
- (In Hindi) 00 Error Code Repair in motherboard !! 00 एरर कोड कैसे रिपेयर करे मदरबॉर्ड में, https://www.youtube.com/watch?v=TuX4rw_SgvE , 7 min. 15 secs., published on 13th Feb. 2019.
- Video of teacher taking a class on motherboard repair using a diagnostic/ debug card: (In Hindi) Use of Diagnostic Card(हिंदी) Debug Card Error Code, Desktop Motherboard Repair With Diagnostic card, https://www.youtube.com/watch?v=0xnRf_qYIOY , 9 min. 26 secs., published on 4th Nov. 2017.
[I later ordered a PCI diagnostic card which I got too late for checking out the Gigabyte motherboard, as it was packed for shipping to service center. But I was able to use it on the old Asus motherboard. It stopped at the basic step of showing four 0’s in its display, which seems to indicate a problem right at the outset with motherboard/processor/RAM.]
At the time I was cleaning the Gigabyte motherboard and its components, when the processor had been removed from the socket, I recall that some stuff fell onto the processor socket. I think I had used pencil eraser on the processor pins and some of that material fell onto processor socket but I don’t recollect it clearly and so it could be some other stuff too. I then tried hard to clean the processor socket. Most of it came off but some particles (visible to naked eye) remained. IIRC, I even used the vacuum cleaner but that did not suck that stuff out.
I also got a singed fingertip! See pic below.

That happened as one of the videos I saw about motherboard problem diagnosis and repair had suggested touching the CPU (mounted without fan) to see if it is getting heated up. If it is getting heated up, it means the CPU is NOT dead. My problem was that I tried it after I had kept power on to the board & CPU for quite some time. So when I touched the CPU (I think it was the older AMD processor on Asus motherboard), it was very hot! [I had also read that using CPU without fan can result in so much overheating of CPU that it may get damaged but ....] My fingertip got singed. It was very sensitive to touch for some hours. Next day it was less sensitive and over the next week or so, it got healed. I now have direct and perhaps unforgettable experience of how hot a CPU can get without CPU fan and cooling paste!
Was now in a position to handle motherboard and associated CPU & CPU fan removal and re-insertion, and assembling all components (incl. SMPS, RAM and disk) into PC box by myself, and so could directly send motherboard to Gigabyte service center
Due to all this work, I had now developed the confidence of being able to send the motherboard to Gigabyte service center on my own and then if it got repaired and sent back, be able to put them all together in my desktop computer and get it working.
So I could contact Gigabyte service center directly, telling them of the problem and couriering the motherboard to them if they were willing to look at it and explore repair possibilities. I decided to explore this rather than go through a technician.
From Gigabyte website I found that Andhra Pradesh (state in which Puttaparthi lies) is serviced by Gigabyte Chennai service center. The manager there responded to my email suggesting that I send them the motherboard, processor (without fan) and RAM and that they will check it out and repair it if possible. There would be a diagnosis charge of Rs.472/- if repair is not possible and if repair is possible I would be told the repair charge and on my OK, repair would be done (no diagnostic charge in this case). That sounded great. I sought some advice on packing as the motherboard is somewhat delicate with lots of components like capacitors mounted in a somewhat fragile way on it. He kindly advised me to use sufficient amount of bubble wrap and send the motherboard in the original box (which I had told him I had). I got the packing done and was ready to ship via courier. Given below are some pics of the packing in case it may be useful to some readers who have to do similar packing for the first time.


Above pic: Final package having another layer of bubble-wrap on the closed mobo box with address info. label kept in plastic cover and taped onto bubble-wrapped box. In the above pic, some parts of the address info. are masked.
Weighing the final package on my small package weighing instrument gave a figure of less than 1.3 kg. I used 1.3 kg as weight for it.
I had a bit of a shock on knowing the very high charges of some courier companies in Puttaparthi for this shipment of 1.3 kg declared weight "electronics" package. I was also disappointed to have my package refused by local post office as speed post parcel, out of concern that the "electronics" item(s) inside would be damaged while transporting the parcel. Finally I got a decently priced courier who charged me Rs.164 and the package was picked up on 3rd Nov. It reached Chennai in a few days but due to Chennai floods, final delivery got delayed to 13th Nov. On 13th itself, some hours after delivery to them, I was called up by Gigabyte Chennai service center stating that the problem is with the motherboard and that repair is possible with repair charges being Rs.1770. They sought my OK for repair which I gave.
Setting up and using Micro 5 based mini PC
Meanwhile I got delivery of Micro 5 on 31st Oct. afternoon (after computer technician’s visit to my flat). That day evening and late night, I got Micro 5 set up for Internet browsing through WiFi connection of my BSNL broadband modem. My limited alternate computer without rechargeable battery and so health-wise comfortable for me, was set up and working!

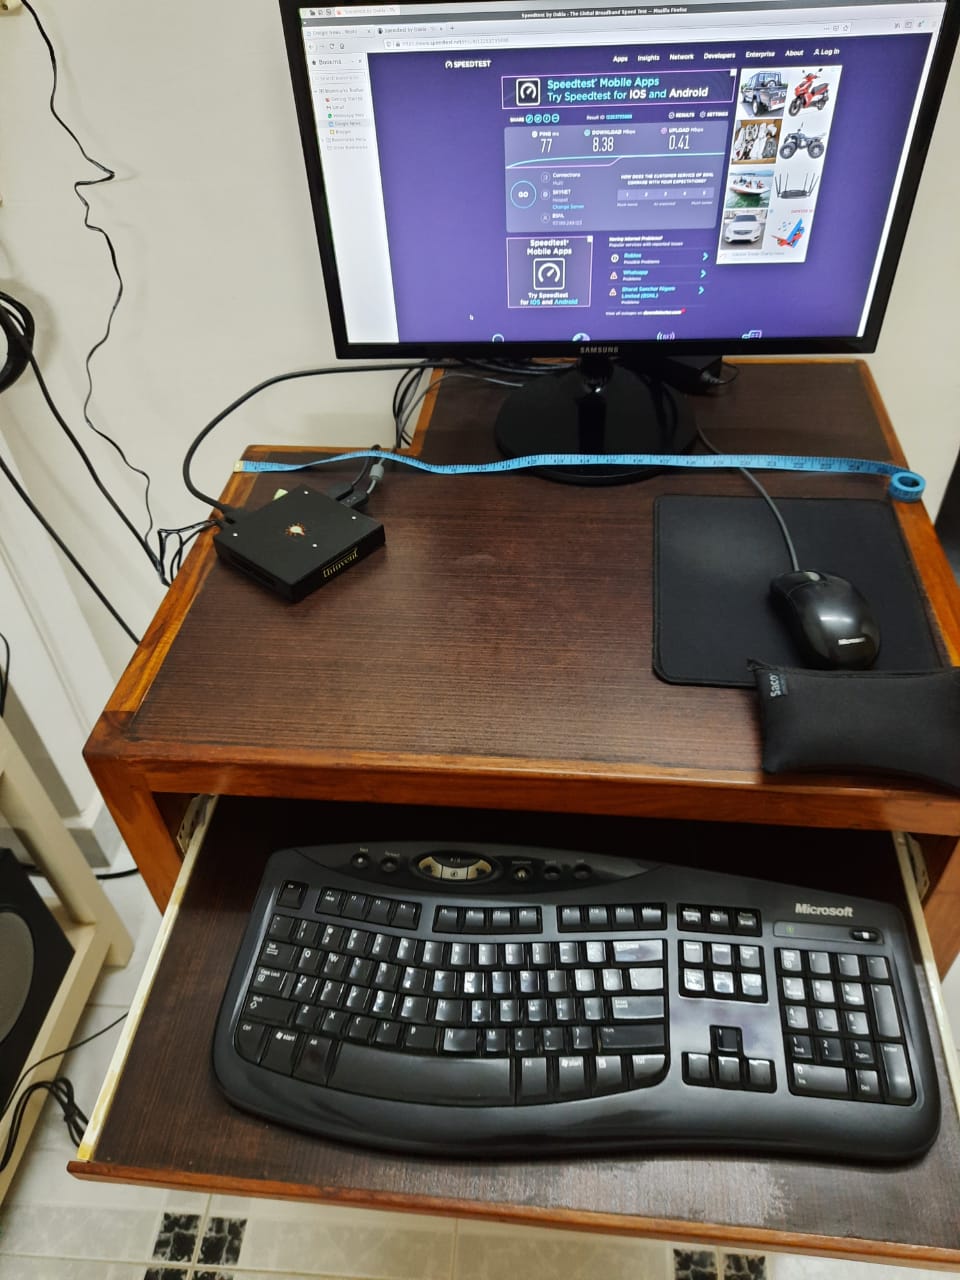

Above pic: Close-up of Micro 5 and its wired connections.
I was quite awe-struck by such a small and light box (around 160 grams on my small weighing scale) letting me work on native Linux GUI programs like LibreOffice writer and File Manager at good speed (very responsive), and do Internet browser related work at somewhat slow speed, on my 21.5 inch LCD monitor, using USB keyboard and mouse. I had never used a thin client or mini PC before but I had read about it for years. Actually using it myself was a wonderful experience. Computer hardware and software technology have come a long, long way from the Wang Laboratories mini computer (Wang VS 80) I started my software career in, in 1984 in Bombay/Mumbai.
Over the next few days, I explored other aspects of Micro 5 and also did additional setup like using wired Ethernet connection from BSNL broadband modem. I faced some issues on more advanced usage of Micro 5 some of which I resolved and some of which I am trying to sort out by communicating with Thinvent company.
My initial feedback on Micro 5 (based) mini PC
Note that I intend to publish a separate, more detailed post on Micro 5 later on.
Internet browsing on it is slow but manageable if one is willing to wait a little for webpages to load. Another issue is lag in characters typed in keyboard to appear in browser window and similar lag in cursor movement keys. Note that this lag is not there with native Ubuntu programs like LibreOffice writer and so it is an Internet browser programs' performance issue on Micro 5. I have to slow down my typing and editing work in browser windows.
Performance for Youtube and Facebook is not great. Facebook browsing/scrolling is very slow, especially on Firefox Mozilla (on Chromium it seems to be a little faster). Youtube videos usually do not play well at full screen (1920x1080 resolution). They sometimes play OK at non-full-screen view though there is some waiting to render at times but sometimes the video rendering is somewhat choppy/not smooth though audio is OK. Even with video rendering being somewhat choppy sometimes, as the audio is OK, Micro 5 is still usable as a temporary fallback measure for viewing youtube videos (usually as only program and window open then).
To confirm that there was no issue with my wired broadband Internet connection for viewing youtube videos, I checked out one youtube video that I had recently viewed on Micro 5 whose video rendering was choppy, with same wired broadband Internet connection on my Dell mini Laptop with configuration of 2 GB RAM, Intel Celeron 2955U, 2 cores, 2 threads, 64-bit, 1.40GHz, 2 MB cache (also referred to as Intel Mobile Celeron) processor, 11.6 inch HD WLED touch, Resolution (maximum) 1366 x 768 display (Dell Inspiron 11 3137). The video played with smooth video rendering at full screen on the Dell mini Laptop. So I don't think it is an issue with my wired broadband connection.
Another point is that I think videos used to play better on Micro 5, in initial days of my usage but I am not sure about this. Recently I deleted Chromium cache but that did not make any noticeable difference. /home/user has "6.4 GiB of 9.0 GiB free (29% used)". Filesystem corresponding to Linux system directories seems to be read-only for automatically logged on user on Micro 5, and that has "612.3 MiB of 3.7 GiB free (83% used)". So I don't think any files I added to Micro 5 as user (not root) has reduced free space to such an extent that Chromium's ability to render youtube videos has been affected.
Opening many webpages at the same time slows down Micro 5 very much. Browser page getting frozen for some seconds, at times, is not unusual. Ideally one should have only a few pages open simultaneously and also run only a few programs simultaneously.
Ubuntu programs pre-loaded on Micro 5 like LibreOffice writer work quite well with fast response time. I type with my normal speed on LibreOffice writer as my typed in characters & cursor movement keys get displayed/acted on immediately without me having to wait. This is in marked contrast to me having to type slowly on browser windows including Compose/Update post webpage for this blog post. Note that the draft version of this post was prepared with LibreOffice writer and then copy-pasted to blogger Compose post webpage, on Micro 5 based mini PC.
The LibreOffice spreadsheet program on Micro 5 opened a Microsoft Excel created spreadsheet properly and I was able to view all the data in it. But I have not created any spreadsheet nor modified any spreadsheet using LibreOffice and so do not have enough exposure to it. LibreOffice on Micro 5 also has a presentation and a database program. I have not used them so far, but it is great to know that those programs are available.
I transferred some mp3 music files from Dell mini Laptop to Micro 5 (using SFTP from Micro 5 Remmina program connected to Dell Windows mini Laptop) and played them on Micro 5 with its audio output connected to Logitech speaker. The music played quite well at moderate volume levels.
A major drawback of above Micro 5 product when used as a Linux mini PC box, is that, at least by default, the product owner is not informed of the root password thereby not allowing installation of new software packages or even manually updating installed software packages. Further, some issues could crop up as one uses the product over time where the solution may require user to logon as root (administrator) and then do the fix procedure.
However, if Thinvent company is able to provide root password of Micro 5 Linux to customer on request, or, if possible, remotely change root password on customer's Micro 5 box to some known dummy value which customer is asked to change at the earliest, then this issue will be resolved. I have written to Thinvent company on this issue and am awaiting a response.
A strange problem with Micro 5 is that both the USB slot and microSD card slot cannot be used for storage devices. Micro 5 reports a mount problem and says that some associated file system is read-only. As root password was not known, I could not try to mount the USB storage drive or micro SD card on some path in filesystem which was read-write for the logged on user. Perhaps if root password is known, this issue can also be fixed.
Note that USB slot works well for non-storage USB devices like keyboard, mouse, webcam and even USB 4 port hub.
Micro 5 startup takes around 40 seconds. Shutdown takes around 12 seconds (till HDMI text and logo are shown on otherwise blank screen). Sometimes Micro 5 restarts after shutdown and so, when I want to power down Micro 5, I switch off power to Micro 5 box when HDMI text and logo are shown on otherwise blank monitor.
Overall view about Micro 5 mini PC box
This is the first “Thin Client/Mini PC” computer box that I have used. I had read about them for years but never used them. So I am amazed that such a small and lightweight CPU+RAM+Board/SoC+flash-storage box (4 in. x 4 in. x 0.75 in. size and around 160 grams weight) can deliver reasonable performance given its low-cost. This "reasonable performance given its low-cost" makes the mini PC based on Micro 5 quite usable, even if slow and with occasional temporary freeze for few seconds, for Internet work like Internet search, viewing articles (text and pics), email, amazon.in purchasing and WhatsApp on web. However, Youtube video viewing and Facebook browsing performance are not great but still manageable if one is ready to wait and also tolerate choppy video playback at times. For native (Ubuntu Linux) programs work like word processing, simple pic editing, PDF viewing and playing mp3 music, Micro 5 delivers good performance if only few programs are run simultaneously.
Update: Desktop computer is back in good working state as I installed repaired Gigabyte motherboard and other components in desktop computer cabinet
29th Nov. 2021 update : Today (29th Nov.) I was informed by Gigabyte service center that the motherboard has been repaired. I was passed on the bank a/c info. where I had to pay Rs.1770, which I did shortly, and shared the transaction info. PDF document with them. They checked out the transaction info. document and told me it is OK. They further told me they would ship the repaired motherboard (and processor and RAM) to me, and send the courier info. over email. I asked them what had gone wrong in the motherboard which they had repaired. I was told they replaced the processor socket on the motherboard.
Perhaps when the Gigabyte service center chaps saw this motherboard and removed the processor from the socket they straight away would have seen some particles in the processor socket that I could not remove when I was cleaning the motherboard and components, as mentioned earlier in this post. Did that then drive their decision to replace the processor socket? I don’t know. [I did not tell them of some stuff falling into the processor socket as I was cleaning the processor & other motherboard components as it would have been too detailed a point, given this was the first time I was interacting with them.]
What was important was whether the motherboard was working now. The Gigabyte service center person confirmed that it is working now. I asked whether it was working with the RAM and processor I had sent, and she said yes.
All this happened by 29th early afternoon itself.
I now have to wait to receive the repaired motherboard (and processor and RAM). If they work when I try it out with SMPS (out of the cabinet) and connected to monitor and keyboard, then Gigabyte service center would have done their job of repair successfully. I will then add cooling paste & mount processor fan on processor and check it out again, before putting them all into computer cabinet and checking whether my desktop PC gets back into working state.
There has been quite some delay in the motherboard repair work but Chennai went through a lot of floods related problems and so I was, and continue to be, patient.
end-update 29th Nov. 2021


[Update on 10th Dec. 2021: Today I was able to have a decent quality Whatsapp audio call on PC desktop with my headset connected to front panel of desktop PC! But the audio jack had to be pushed in tightly into front panel socket. Earlier today I was not able to hear the audio but that seems to have been because I had not pushed it in hard. Even if it is slightly loose, the audio is not heard. At that time, I had come up with a workaround of using audio socket of Logitech speaker (which was connected to audio back panel of desktop PC) with microphone jack alone connected to front panel of desktop PC. This was possible because the desktop cabinet and Logitech speaker with socket are close to each other. This setup worked but there was always a possibility of wire damage if speaker or PC desktop move(s) in such a way as to stretch the wire to maximum.Once I figured out the issue was that I had not tightly pushed in the audio jack in front panel audio socket, with audio jack tightly pushed in socket, I tested with Whatsapp, Voice Recorder and VLC player. The setup worked with all three.Yesterday I had tried using a USB adapter (and sound card) for audio connected to headset, with front panel USB 2.0 port. That too worked.
I have not looked into audio quality in detail. Perhaps audio quality of both USB adapter for audio + headset connected to front panel as well as headset directly connected to front panel, are not as good as when back panel audio & mic sockets are used. But for audio phone calls, the quality seems to be good enough as in the call I had today (perhaps for around 15 minutes), the person I called was clearly audible to me, and the person told me that I was also clearly audible to him. The volume level was also good with me keeping the system audio volume to perhaps around 50 percent or so as higher values made the sound too loud on my headset.Note that this front panel audio got into some sort of working state only when I assembled the desktop PC after I got the repaired motherboard. When the technician had delivered me the reassembled desktop in Sept. 2017 when most components of it like motherboard, processor and RAM were upgraded by him, the front panel audio was not working. I told him about it but he did not show interest in fixing it and as I did not need that feature badly then, I stopped pursuing the matter with him.Now I have the knowledge to do these things myself. In particular, I now know how to connect front panel audio wires to appropriate part of motherboard (which I had not known prior to my assembling work earlier this month). I also know that if I want I can consider buying a better quality front panel audio bracket and installing it on the desktop PC. Knowledge is power! end 10th Dec. 2021 update]
[11th Dec. 2021 update: The USB audio adapter I have mentioned in above update is: "WRIGHT USB to 3.5mm Jack Audio Adapter, External USB Stereo Sound Card with 3.5mm Headset and Microphone Jack for Windows, Mac, Linux Extra, PS4, Plug and Play", https://www.amazon.in/gp/product/B09FXCKNPQ/ , which I bought for Rs.349/- in Nov. 2021.
The headset I use is: "Logitech H110 Wired headset, Stereo Headphones with noise-cancelling Microphone,3.5-mm Dual Audio Jack, PC/Mac/Laptop- Black", https://www.amazon.in/gp/product/B003H4QPJQ/ , which I bought for Rs.729/- in Feb. 2021. end 11th Dec. 2021 update]


Comments
Post a Comment